
Technic-ian
|

|
This is my very first robot, I'm not the first to build a robot that looks around to avoid obstacles but it was the first time for me, it was a huge learning curve and an opportunity to learn a new skill.
This is a great project for learning more about programming & robots in general, when you master this then you will want to add more things to it. I will be treating this robot as a testing base for other similar projects.
Here is a video of the Technic-ian in action:
This is a great project for learning more about programming & robots in general, when you master this then you will want to add more things to it. I will be treating this robot as a testing base for other similar projects.
Here is a video of the Technic-ian in action:
The robot is controlled by a micro processor board called the Arduino Uno V3, programming this was the best part for me, I had only ever done this once before as part of my homemade Segway project and since then I have been hooked. It seems that there are no limits to what you can program and make at home, it just requires time.
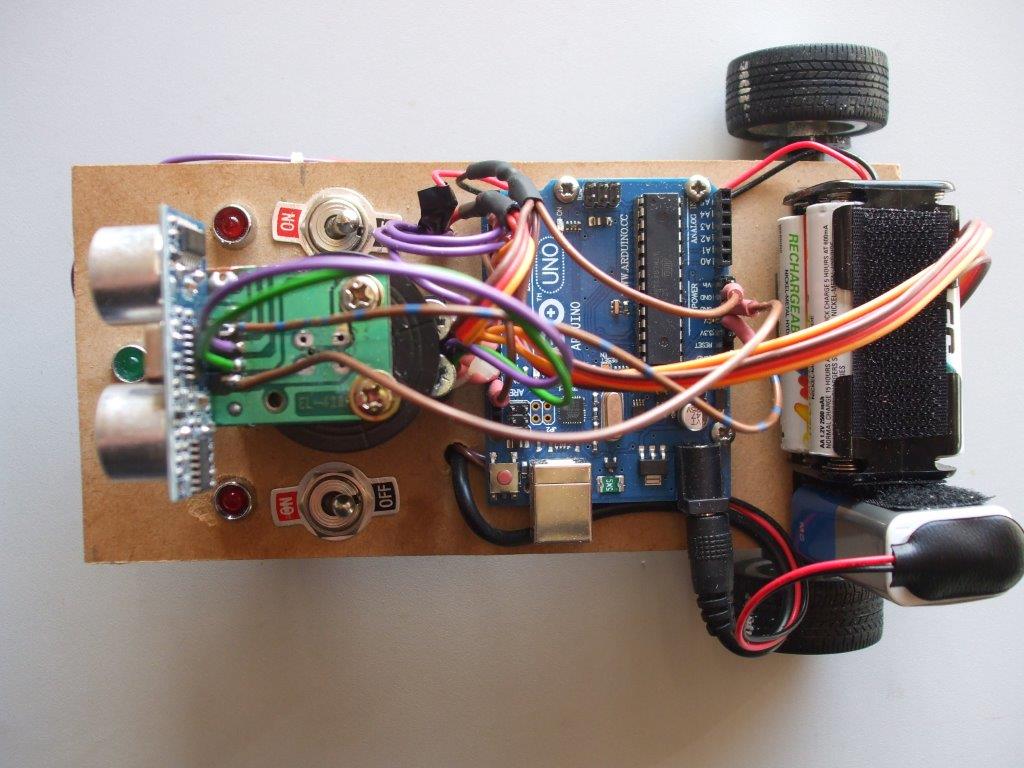
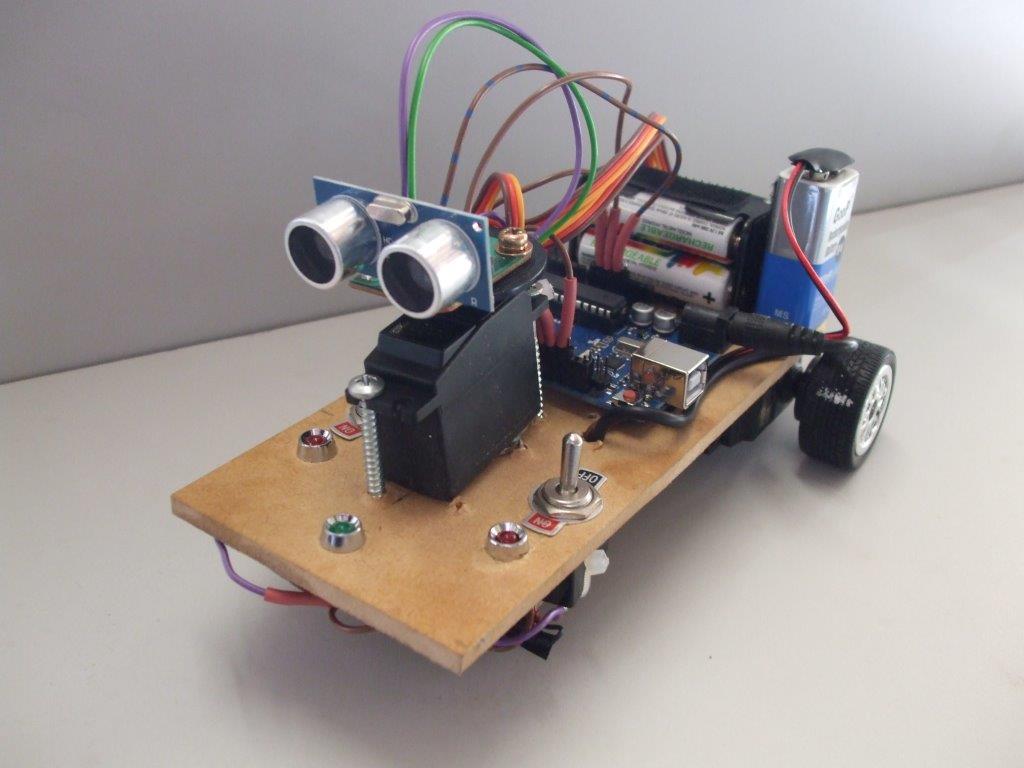
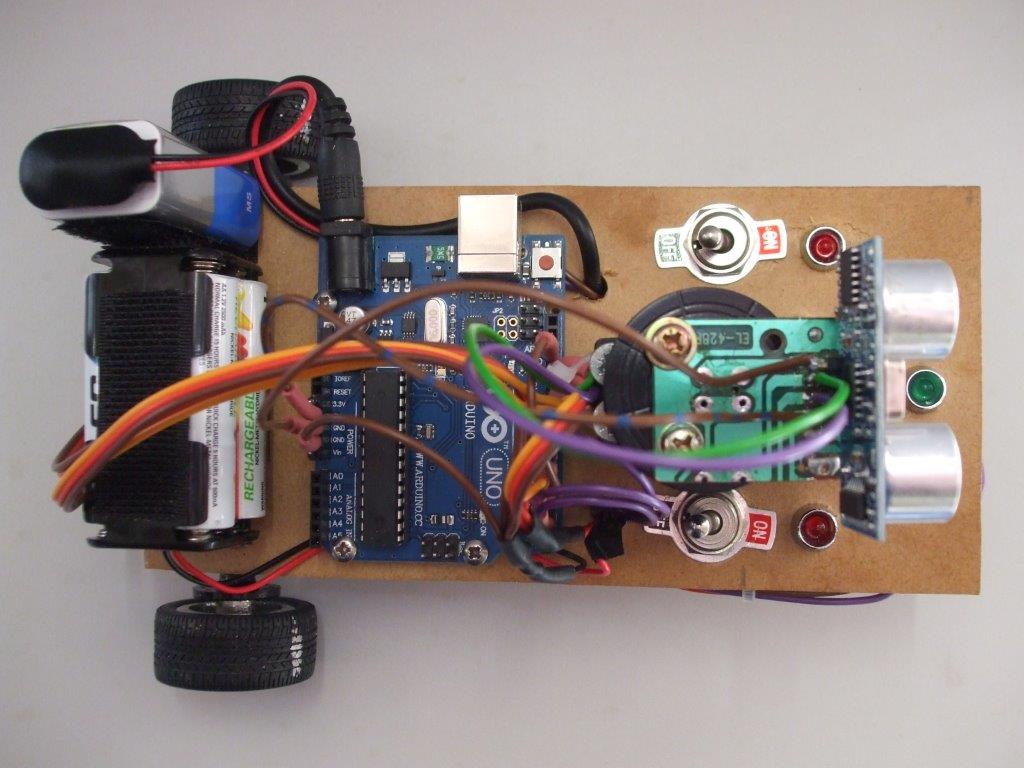
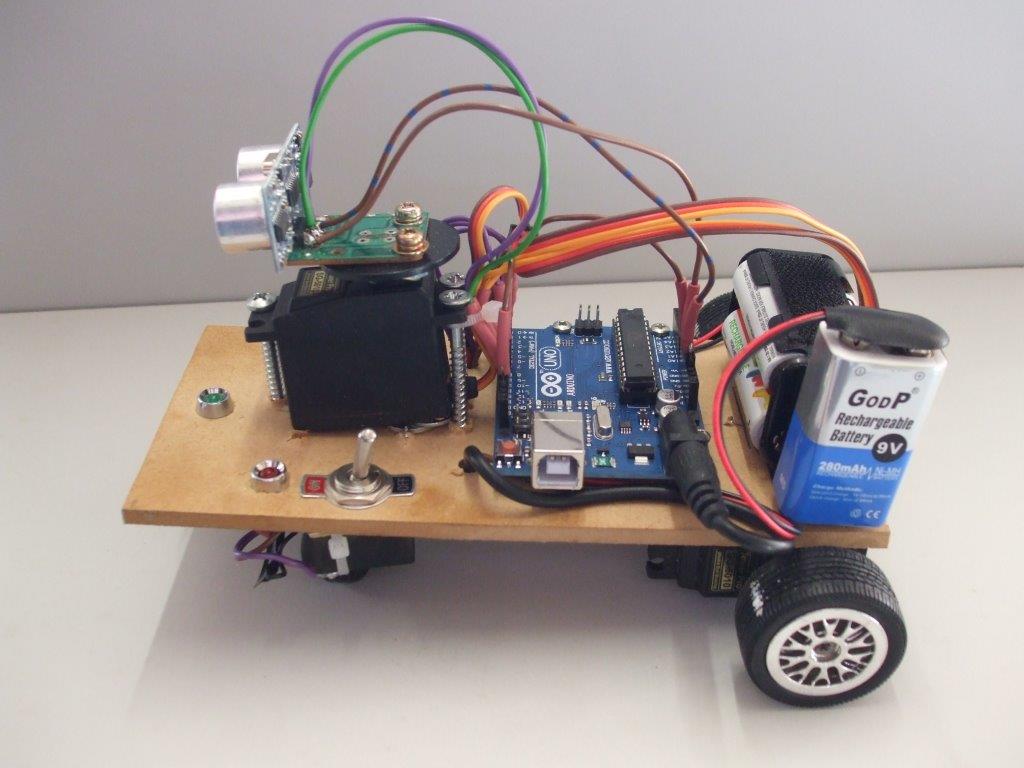
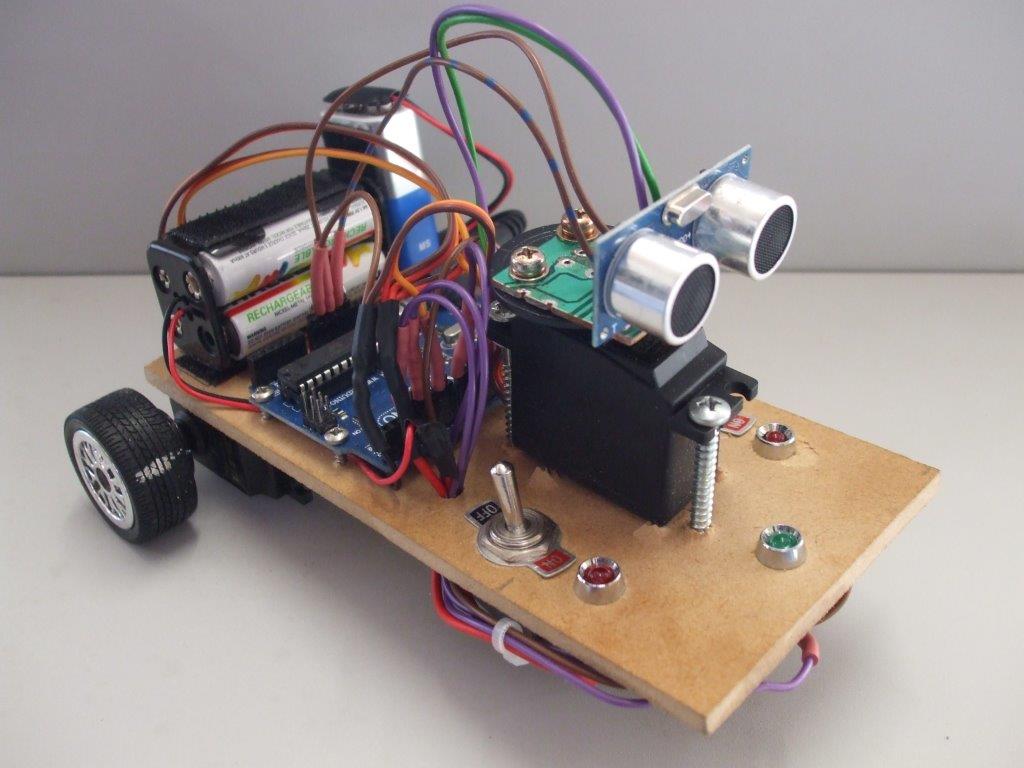
Here are a few pictures, I was going to make this robot look good and pay a lot of attention to the cosmetics of it, but what happened was that I got far too excited and eager to see if it worked or not. In the end I rushed it just to see it work. I've googled lots of information regarding robots and I have often seen robots that look badly put together, I can now see why, the fun is in seeing if it works not how good it looks.
Having said that I think I will make a good looking version 2 some day, but for now you will have to put up with these pictures:
|
|
Here's a video showing how it works, the LEDs at the front will come on if that area is the clearest path.
If the way forward is blocked then the sensor will look left & right & choose the best path and turn in that direction. I've raised the wheels off the ground in the video so you can see the LEDs without me chasing the robot with the camera.
If the way forward is blocked then the sensor will look left & right & choose the best path and turn in that direction. I've raised the wheels off the ground in the video so you can see the LEDs without me chasing the robot with the camera.
Here is the code, it's in txt format so just cut and paste it into your Arduino IDE sketch.
I used version 1.0.4 of the Arduino IDE along with the Arduino Uno V3 board.
I used version 1.0.4 of the Arduino IDE along with the Arduino Uno V3 board.
| technic-ianv1.txt |
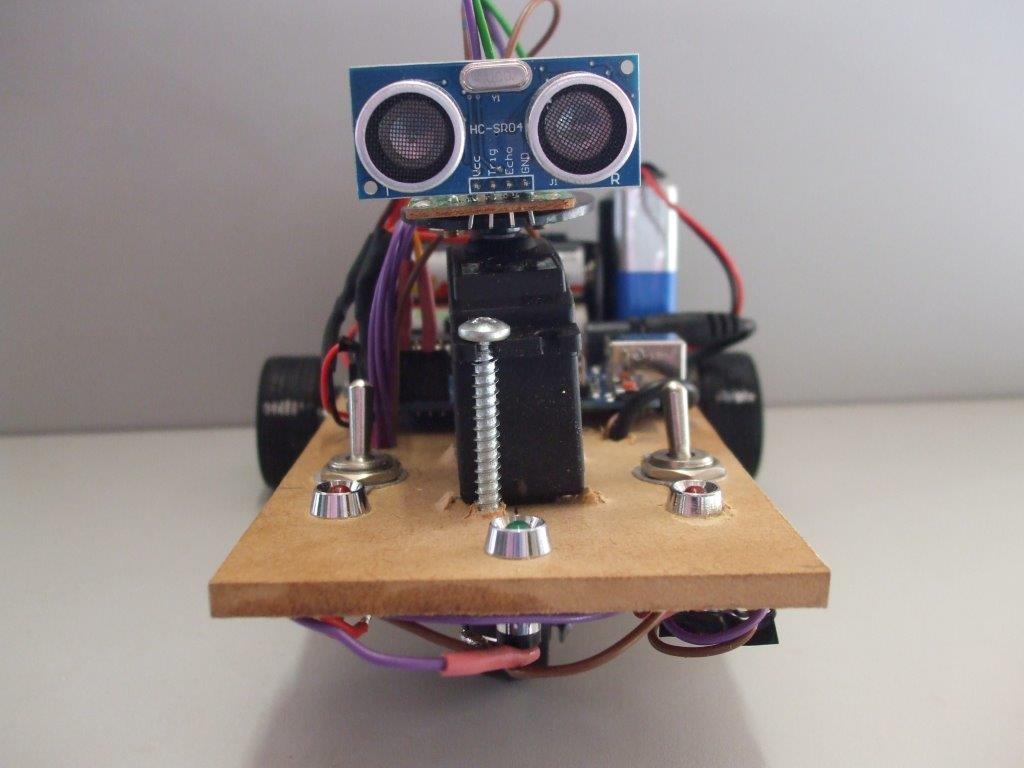
The ultrasonic sensor (the thing with the 2 eyes) sends & receives sound waves, the sound waves echo back off of objects, the micro seconds it takes to receive them is then calculated into something more meaningful such as centimeters.
If the way forward is blocked then the servo that the sensor is mounted on will turn right & the sensor will check the distance & then turn left & check that distance. It will then compare the distances & select the best path.
The 3 Tower Pro SG-5010 servos are powered by 4 AA batteries
The Arduino Uno is powered by one 9v battery.
The Arduino powers the 5v ultrasonic sensor which is an HC-SR04
There are 2 servos driving the back wheels, these servos have been modified to continuously turn instead of only moving 180 degrees & then stopping. I will document how to do this later but there are many youtube videos out there showing how to do it, I removed the servos internal pot & replaced it with 2 resistors & also removed a plastic stop.
The front wheel is just a small castor wheel from a local DIY store.
I have used 2 switches, one for the arduino power & the other for the servo power. I found having these 2 switches were invaluable for testing as there are many times that you want the arduino & sensor on but do not require the servos.
When programming with the Arduino IDE you can use Libraries, these are extra files that contain information about a certain component that makes it easier to use that component in the program. I used the standard servo library that comes with the Arduino software, but I also used another library for the ultrasonic sensor, the library is called NewPing and it does not come with the software. It is this library that you will have to download & copy to your arduino library folder.
The files would normally come in a folder called NewPing so please create this folder & copy these 3 files into it.
| newping.h |
| newping.cpp |
| keywords.txt |
I think I have covered the basics here, for some of you this will be all you need, you will be able to look at the Arduino code to see what pins I have attached things to and wire it all up based on that.
I cut out a piece of old circuit board to mount the ultrasonic sensor on, the circuit board had 4 holes that enabled me to solder the sensor to it, I then drilled a hole through the circuit board to mount it to the servo, I did not electrically use the board within the circuit.
I know what it's like to get started on something new so I will create a wiring diagram along with more detailed information very soon.
If you have never used an Arduino or have never done any programming then I would recommend reading our Day 8 Project Segway page to help you get started along with visiting the arduinos main website.
Here are a couple of other videos of the robot in action, I hadn't intended publishing these because the robot finds it's way out of the testing area and leaves which make the video shorter than I wanted but it is still good to see it working, it's doing exactly what we want it to do so here they are:
I'm already thinking about what I should make next, I had thought of installing lots of LEDs & to have each one come on as the forward distance gets shorter, I've also ordered some light sensitive photo resistors which should be fun. Maybe I can use them to make a solar tracker to orientate my homemade solar panels or maybe use them to get the robot to also travel towards the lightest area as long as it is clear etc etc.
I actually only built this robot because I'm in the middle of building a solar hot water system & I can't do anything on it because it's raining, but the rain stopped 2 days ago and I'm still playing with robots!
I will get some parts together to create kits so you can build your own without the hassle of sourcing the correct parts yourself. Electronic parts are fairly cheap when purchased in bulk so I'm hoping to be able to offer the parts at a great price, although I'm struggling to get affordable wheels so like me you may have to take the wheels off of something else or go to your local car boot market & buy a toy car with wheels for a few dollars.
If you like our site then please click on the Facebook icon at the top right of this page, thank you.
For more information you can email us via our Contact Us page.